When you upgrade your Windows operating system, a folder named Windows.old is created to store the previous version of Windows. This folder can take up a significant amount of disk space, and if you’re sure you don’t need to revert to the previous version, you can safely delete it. In this blog post, we’ll explore two methods to delete the Windows.old folder: using Disk Cleanup and PowerShell.
You wouldn’t care about this folder until you run out of space!
Method 1: Using Disk Cleanup
Disk Cleanup is a built-in utility in Windows that helps you free up space on your hard drive by deleting unnecessary files. Here’s how you can use it to delete the Windows.old folder:
- Open Disk Cleanup:
- Press
Win + Sto open the search bar. - Type
Disk Cleanupand select the Disk Cleanup app from the search results.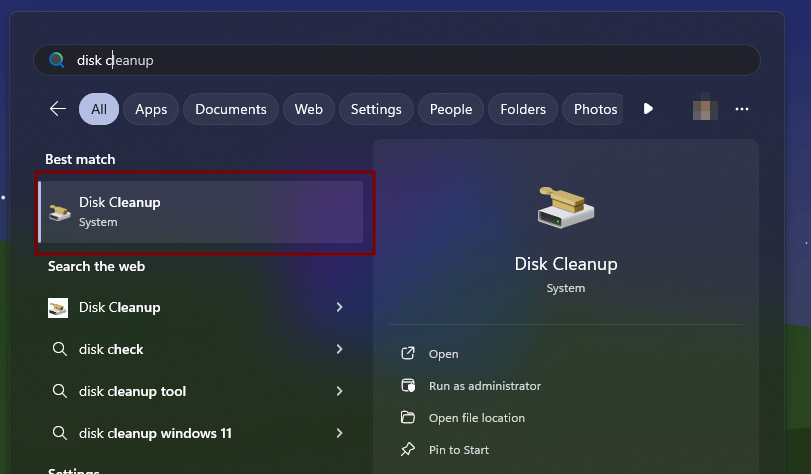
- Press
- Select the Drive:
- If prompted, select the drive where Windows is installed (usually
C:) and clickOK.
- If prompted, select the drive where Windows is installed (usually
- Clean Up System Files:
- In the Disk Cleanup window, click on the
Clean up system filesbutton. This will relaunch Disk Cleanup with additional options.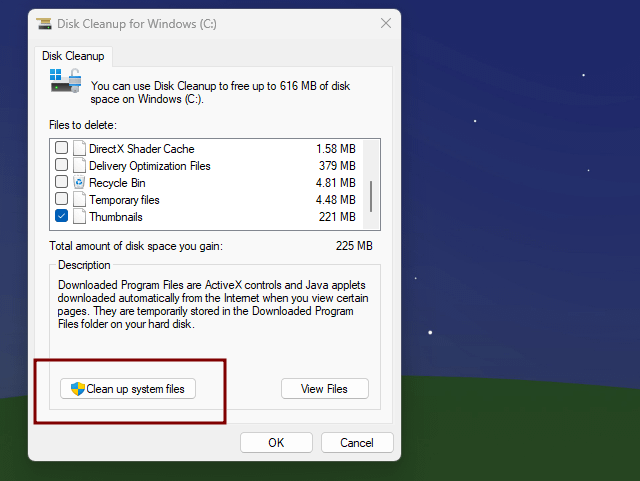
- In the Disk Cleanup window, click on the
- Select Previous Windows Installations:
- After the scan is complete, scroll down and check the box next to
Previous Windows installations. You can also select other items you want to delete. - Click
OKand thenDelete Filesto confirm.
- After the scan is complete, scroll down and check the box next to
- Wait for the Cleanup to Complete:
- Disk Cleanup will now delete the Windows.old folder along with other selected files. This process may take a few minutes.

Method 2: Using PowerShell
Here’s how you can use it to delete the Windows.old folder:
- Open PowerShell as Administrator:
- Search and open
Windows PowerShell (Admin)from the start menu.
- Search and open
- Take Ownership of the Windows.old Folder:
- Before you can delete the folder, you need to take ownership of it. Run the following command:
takeown /F "%SystemDrive%\Windows.old*" /R /A - This command will take ownership of the Windows.old folder and all its subfolders and files.
- Before you can delete the folder, you need to take ownership of it. Run the following command:
- Grant Full Control to Administrators:
- Next, grant full control to the Administrators group by running:
cacls "%SystemDrive%\Windows.old\*.*" /T /grant administrators:F
- Next, grant full control to the Administrators group by running:
- Delete the Windows.old Folder:
- Finally, delete the folder using the
Remove-Itemcmdlet:rd /S /Q "%SystemDrive%\windows.old“ - This command will delete the Windows.old folder and all its contents.
- Finally, delete the folder using the

Understanding Key Commands for Managing Windows.old Folder
The takeown command is used to change the owner of files. The /F parameter allows you to input the file path, with the * acting as a wildcard for all files. The /R parameter tells the command to recurse through all subdirectories, and the /A parameter assigns ownership to the administrators group.
The icacls command modifies the ACLs (Access Control Lists) on files to grant full control permission. The /T parameter ensures that permissions are changed for all files in all subdirectories. The /grant administrators parameter is used to grant the specified permissions to the user or group, and the :F parameter specifies Full Control.
The RD command, short for RMDIR, is used to delete files. The /S parameter removes all directories and files within the specified path, while the /Q parameter enables quiet mode, suppressing the system from asking for confirmation.
Conclusion
Deleting the Windows.old folder can free up a significant amount of disk space, especially if you have recently upgraded your Windows operating system. Whether you prefer using the graphical interface of Disk Cleanup or the command-line power of PowerShell, both methods are effective and straightforward. Always ensure that you no longer need the previous version of Windows before deleting the Windows.old folder.
Feel free to share your experiences or ask any questions in the comments below!
Leave a Reply